How to Wire 240V, 208V & 120V, 1 & 3-Phase, High Leg Delta Main Panel?
How to Wire High Leg Delta Main Panel for 120V, 208V & 240V, Single Phase & Three Phase Circuits?
What is High Leg Delta?
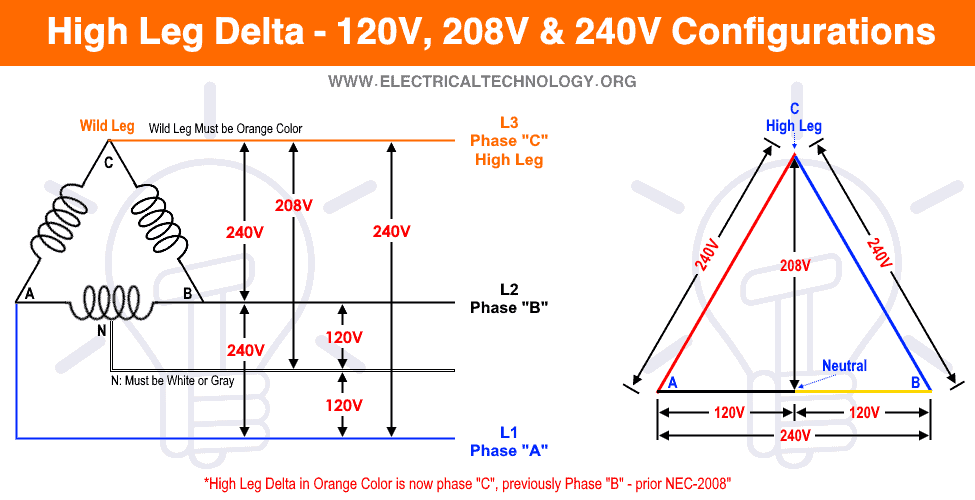
High Leg Delta (also known as Power Leg or Wild Leg) is a three phase, four wire power distribution system used in commercial buildings in North America especially in rural and older installations.
The main advantages of the high leg delta system is that there are three types of available voltage i.e. 120V, 208V and 240V.
For high leg delta power, the electric power providers install three transformers Wye-Delta or Delta-Delta (we will discuss Wye-Delta for this tutorial due to 120V, 208V and 240V, 1 & 3 Phase Supply) or two transformers in Open delta configuration for smaller loads which still needs three phase power supply..
- In Wye-Delta, The three phases or hot wires plus a center tapped neutral comes from the transformer. In the delta secondary, each hot connects to two separate transformers.
- In Open-Delta, two hot wires and one neutral wire comes from the large transformer and one hot wire as a high leg delta comes from the smaller transformer. The overall wires enters to the commercial panel in still three hot including high leg delta and one neutral wire.
Related Posts:
- How to Wire 120V & 240V Main Panel? Breaker Box Installation
- How to Wire 208V & 120V, 1-Phase & 3-Phase Main Panel?
Good to know: Other names used for High Leg Delta: Wild Leg, High Leg, Power Leg, Dog Leg, Orange Leg, Red Leg, Stinger Leg, Bustard Leg. Also, use the Orange color for high leg delta hot busbar (now phase “C”, previously Phase “B” – prior NEC-2008″.
Caution:
- The High Leg Must Terminate on the “B” Phase.
- Utilities require the High Leg conductor in meters and box be located on the “C” Phase.
In addition, High leg delta is not recommended if you are only interested in the 208V system as you can achieve it by Wye-Wye, three phase four wire system which provides 120V & 208V, single and three phase supply.
For high Leg delta supply, the electric power supply company installs three transformers to provide 120V, 208V and 240V (1 & 3 Phase) supply voltage levels based on the end user requirement. The primary side of these three step-down transformers are connected to the 4.5k-7.2kV supply. The transformers then reduce the level of voltage to the desired 240V, 208V and 120V applicable to the commercial buildings and industrial installations.
In this kind of power distribution configuration, the following different levels of voltage are available across three wires + neutral from the commercial transformers.
- 120V Single Phase, 3 Wires (One Hot wire + Neutral wire + Ground Wire)
- 208V Single Phase, 3 Wires (One Hot Wire from High Leg Delta + Neutral wire + Ground wire)
- 240V Single Phase, 3 Wires (Two out of phase Hot wires + Ground wire)
- 240V Three Phase, 4 Wires (Three out of phase Hot wires (one is High Leg delta) + Ground wire)
To get all these values, you may use the following simple math calculations (Phase, Lines and Hot represents the same thing).
- Voltage between Phase and Neutral = 1/2 × 240V = 120V (1-Φ).
- Voltage between High leg and Neutral = 1/2 × 120V × √3 = 208V (1-Φ).
- Voltage between two Hot Phases = 120V × 2 = 240V (1-Φ).
- Voltage between three Phases = 240V (3-Φ).
These are the general setup and may vary and depend on the installation e.g. neutral wire may be needed for three phase 240V outlets etc. You may know more about the comparison and differences between Star-Delta (Wye-Delta) connection with advantages and disadvantages.
High leg delta configuration can also be used for 240, 415 & 480V supply systems. Additional configurations such as high leg open delta with two transformers, delta with no neutral, delta with no ground or grounded delta are also used but we will stick to the Star (Wye) and Delta connection based on panel wiring needed in our case.
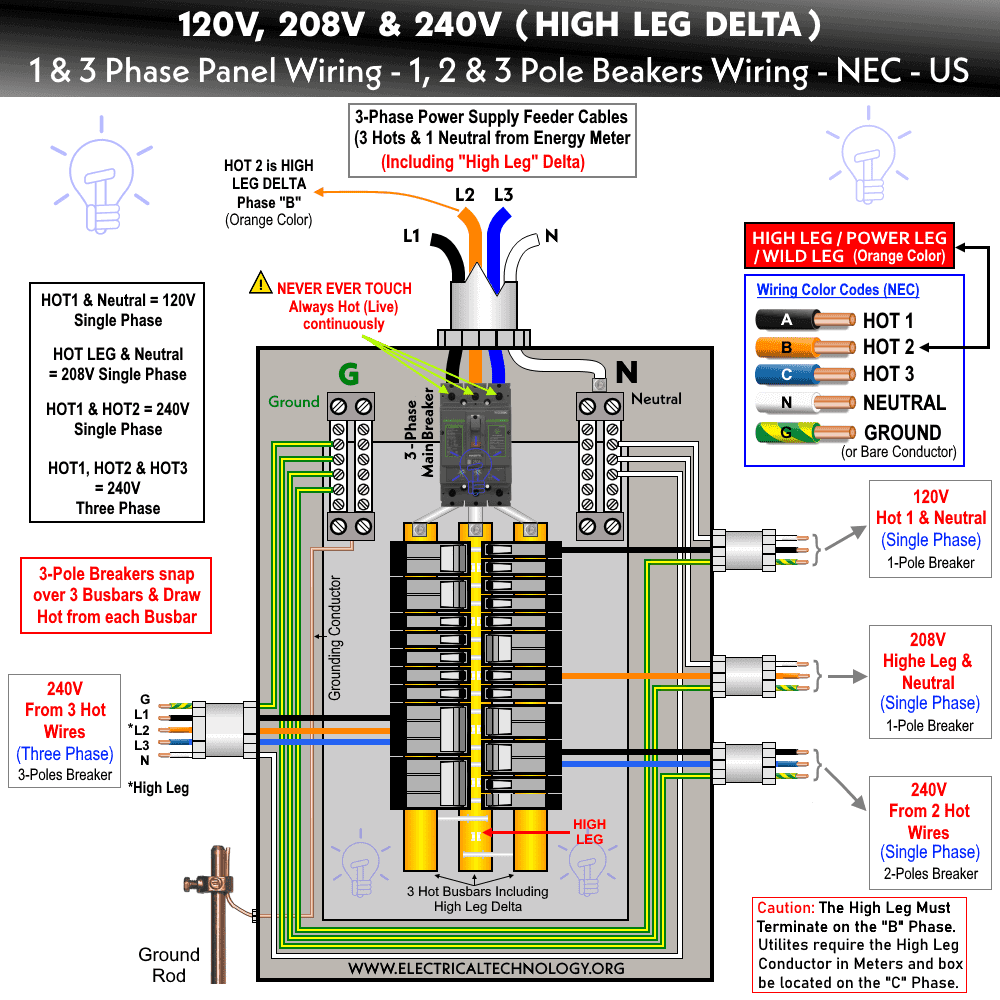
The three phase system including single phase power from the secondary of the distribution transformer through insulated wires enters the meter box and safety switch and finally enters in the main panel box. Each line or hot wire connects to a separate bus-bar in the panel box for further distribution. Keep in mind that the color of High leg delta wire is orange denoted by “C”. In older cases, the middle wire as high leg delta in the orange color was denoted by “B” phase “NEC-2008”. Three poles, two poles and single pole circuit breakers are used to snap (i.e. in the metal tracks to hold the CB’s tightly) over three busbars including Wild leg delta which draws HOT from each busbar.
In 120V, 208V and 240V, 1-Phase & 3-Phase, high leg delta wiring systems,, the available voltage levels are as follows inside the main breaker panel.
- Voltage between three hot wires (hot 1, hot 2 (high leg delta) & hot 3) = 240V Three Phase
- Voltage between any two hot wires = 240V Single Phase
- Voltage between high leg delta hot wire and Neutral = 208V Single Phase
- Voltage between hot wire (excluding high leg delta) and Neutral = 120V Single Phase.
Click image to enlarge
Related Post:
- Single Phase Electrical Wiring Installation in Home according to NEC & IEC
- Three Phase Electrical Wiring Installation in Home – NEC & IEC
Let’s see how to wire High leg delta load centers and main panels for 120V, 208V and 240V single phase and three phase breakers and load points as follows.
How to Wire 120V, 1-Phase Circuits & Breakers?
The following tutorial shows how to wire 120V single phase breakers in and ordinary load points in a High leg delta panel designed for commercial and residential areas.
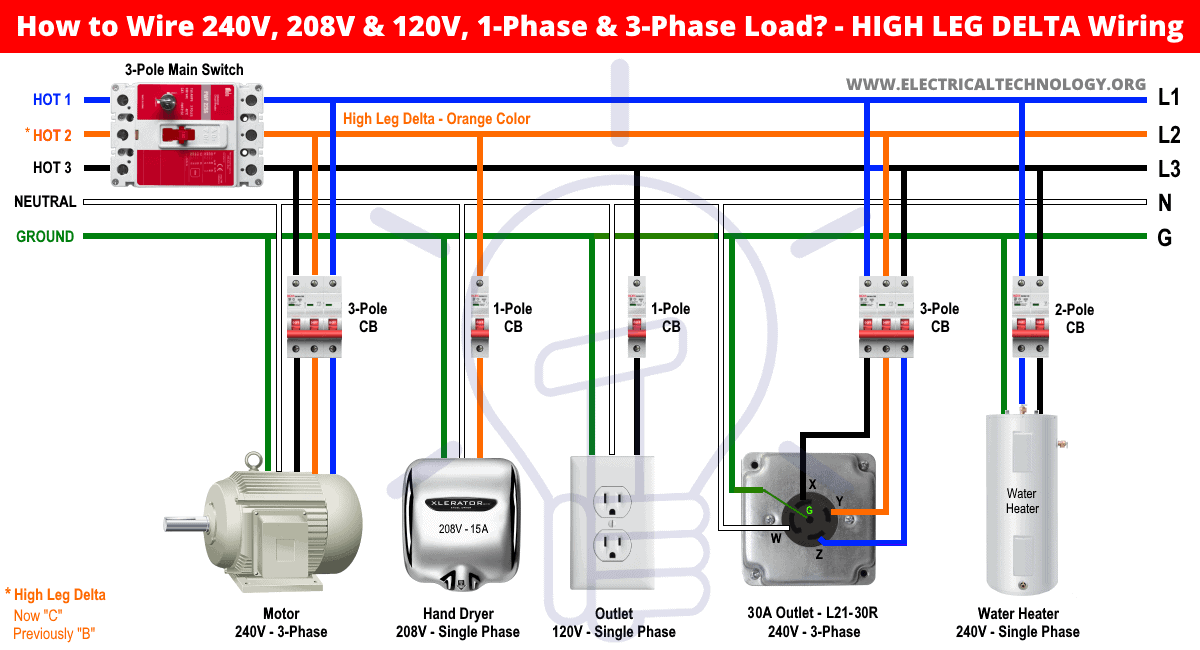
To connect a 120V single phase standard outlet, just install a single pole MCB circuit breaker and connect any hot (hot 1 or hot 3, not high leg delta as hot 3) to the breaker. Connect the hot wire from the breaker to the hot (L) terminal of the outlet. Similarly, connect both neutral and ground wires to the receptacle “N” and “G” terminals. The outlet is ready to power up a single phase 120V load now.
Related Posts:
- How to Wire and Install an Electrical Outlet Receptacle?
- How to wire a GFCI Outlet?
- How to Wire an AFCI Outlet?
How to Wire High Leg Delta, 208V, 1-Phase Circuits & Breakers?
The following tutorial shows how to wire a 208V single phase breaker fed up by a high leg delta busbar for residential and commercial uses.
208V single phase can be achieved between high leg delta (orange color) and neutral. In this case, we have connected a hand dryer (208V, 15A) to a single pole breaker. The single pole breaker is connected to High-Leg Delta as hot wire, neutral and ground wire.
How to Wire 240V, 1-Phase Circuits & Breakers?
In the same panel having a high leg delta line, we may connect and install single phase 240V loads. To do so, simply connect the appliance (water heater in our case) via two poles breaker connected to two hot wires (such as Hot 1, Hot2 and Hot 3) and ground wire. Connect the additional neutral wire if needed.
For example, you need all four wires i.e. two hot wires + ground and neutral for four poles, 125-250V single phase outlets such as 14-15R, 14-20R, 14-30R, 14-50R, 14-60R, L14-20R, L14-30R.
Related Posts:
- How to Size a Load Center, Panelboards and Distribution Board?
- How to Determine the Number of Circuit Breakers in a Panel Board?
- How to Determine the Right Size Capacity of a Subpanel?
How to Wire 240V, 3-Phase Circuits & Breakers?
In a high leg delta panel, we need four or five wires (three as hot) for three phase 240V circuits. As shown in the following fig, we have two appliances viz three phase motor and L21-30R or L21-20R outlet. You can see that we have connected all the three hot wires including the high leg delta. Additionally, we have connected neutral and gerund wires as well. You may do the same with other devices having the same design for connection such as surge protectors found in main disconnect switches, main distribution panel, sub panels, load centers and equipment locations.
You don’t always need the neutral wire in all cases for 240V three phase circuits (e.g. Intermatic AG2403C3 surge protection – 240 VAC three wire plus ground mostly found at service entrances and meter cabinets). Same is the case for 4-poles, 3-phase, 240-250V, four-wires outlets such as 15-15R, 15-20R, 15-30R, 15-50R, 15-60R, L15-20R, L15-30R etc.
In 3-Poles, 240-250V, 3-Wires, Non-grounding, 3-Phase outlets such as 11-15R, 11-20R, 11-30R, 11-50R, L11-15R, L11-20R, L11-30R etc. You have to only connect all three Hot wires i.e. there is no need to connect the ground and neutral wires.
Click image to enlarge
Related Posts:
- How to Wire Combo Switch and Outlet?
- How to Wire GFCI Combo Switch and Outlet
- How to Wire an AFCI Combo Switch
Wiring Color Codes for High Leg Delta Panel:
In this tutorial, we have used different wire colors for illustration purposes only. Please follow the National Electric Codes i.e. NEC wiring color codes or other local area color codes.
For 120V, 208V & 240V, 1-phase and 3-phase circuits, we have used the NEC + general practice wiring color codes as follows.
- Blue = Hot 1 or Line 1
- Orange = Hot 2 or Line 2 (HIGH LEG DELTA)
- Black = Hot 3 or Line 3
- White = Neutral Wire
- Green = Bare Conductor as Ground wire ( as grounding & earthing)
The recommended colors for hot wires in a high leg delta three phase system are Black, Orange and blue for three hot wires where High Leg Delta must be indicated with Orange color. In other words, High Leg delta must be identical among other hot wires.
Do not use green, green with yellow stripes or a bare conductor for wires carrying voltage. Only and only use copper wire to reduce the resistance and heat instead of aluminum wires in the main panel box wiring.
Related Posts:
- How to Wire a Distribution Board with RCD (Residual Current Devices)
- How to Wire a GFCI Circuit Breaker?
- How to Wire an AFCI Breaker?
Safety Precautions
- Disconnect the power source (and make sure it is really swathed OFF) before servicing, repairing or installing electrical equipment. To do so, switch off the main switch in the main panel box.
- Never stand or touch wet and metal parts while repairing or installation of circuits.
- Read carefully all the cautions and instructions and follow them strictly while doing this tutorial or any other work in practical related to electrical works.
- Always, use the right size cable and wire, proper size outlets and switch and suitable size of circuit breakers. You may also use the Wire and Cable size calculator to find the right gauge size.
- Never ever try to play with electricity (as it is dangerous and can be fatal) without proper guidance and care. Do the installation and repairing work in presence of experienced persons having vast knowledge and good practice who knows how to deal with electricity.
- Doing your own electrical work is dangerous as well as illegal in some cases. Contact the licensed electrician or the electric power supply provider before practicing any change/modification in electrical wiring connections.
- The author will not be liable for any losses, injuries, or damages from the display or use of this information or if you try any circuit in wrong format. So please! Be careful because it’s all about electricity and electricity is too dangerous.
Related Wiring Installation Tutorials:
- How to Wire a Single Element Water Heater and Thermostat?
- How to Wire 120V Water Heater Thermostat – Non-Simultaneous?
- How to Wire 120V Simultaneous Water Heater Thermostat?
- How to Wire 240V Water Heater Thermostat – Non-Continuous?
- How to Wire 240V Simultaneous Water Heater Thermostat?
- How to Wire 3-Phase Simultaneous Water Heater Thermostat?
- How to Wire 3-Phase Non-Simultaneous Water Heater Thermostat?
- How to Toggle Electric Water Heater Between 120V and 240V?
- Staircase Wiring Circuit Diagram – How to Control a Lamp from 2 Places?
- Corridor Wiring Circuit Diagram – Hallway Wiring using 2-Way Switches
- Tunnel Wiring Circuit Diagram for Light Control using Switches
- Hospital Wiring Circuit for Light Control using Switches
- Hotel Wiring Circuit – Bell Indicator Circuit for Hotelling
- Hostel Wiring Circuit Diagram and Working
- Godown Wiring Diagram – Tunnel Wiring Circuit and Working
- How to Wire Auto & Manual Changeover & Transfer Switch – (1 & 3 Phase)
- How to Wire 4-Way Switch (NEC) or Intermediate Switch as 3-Way (IEC)?
- How to Wire Single Pole, Single Throw (SPST) as 2-Way Switch?
- How to Wire Single Pole, Double Throw (SPDT) as 3-Way Switch?
- How to Wire Double Pole, Single Throw Switch? Wiring DPST
- How to Wire Double Pole, Double Throw Switch? Wiring DPDT
- How to Wire Double Switch? 2-Gang, 1-Way Switch – IEC & NEC
- Even More Residential Wiring Installation Tutorials


Great and thorough article. While reading I noticed what appears to be a small error, where the result from your first calc should be 120V, not 220V.
Pasted from article above:
Voltage between Phase and Neutral = 1/2 x 240V = 220V (1-Φ).
Voltage between High leg and Neutral = 1/2 x 220V x √3 = 208V (1-Φ).
Voltage between two Hot Phases = 120V x 2 = 240V (1-Φ).
Voltage between three Phases = 240V (3-Φ).
Hi Keith,
The typo has been modified now. Thanks for the correction.