How to Wire Solar Panels in Series-Parallel Configuration?
Series-Parallel Connection of Solar Panels to the Battery and Inverter
For small residential loads, using a series-parallel combination of solar panels is less common but still a possible wiring configuration. This setup connects the solar panels to batteries, AC and DC loads through a charge controller, battery, and UPS/inverter. Depending on the system requirements and design, solar panels and batteries can be connected in series, parallel, or a more complex series-parallel configuration to meet specific needs.
In this tutorial, we will explain the basic wiring of photovoltaic panels in a series-parallel configuration. This includes connecting them to one or more batteries, a charge controller, and both AC and DC loads via the charge controller or an inverter.
This arrangement is needed when we want to double the level of voltage (voltage is additive and current is same in series connection) as well as the charging current (current is additive and voltage is same in parallel connection) from solar panel to the batteries and other load points. In this case, we will have to connect multiple solar panels (photovoltaic array) in series parallel connection to the batteries and load points.
By connecting the photovoltaic panels in series-parallel configuration, we get benefits of both connections i.e. doubling the level of voltage and increasing the current rating from solar panels to the batteries and AC/DC load.
Related Posts:
- How to Wire Batteries in Series to a Solar Panel and UPS?
- How to Wire Batteries in Parallel to a Solar Panel and UPS?
Voltage & Current in Series-Parallel Connected Solar Panels
Suppose we have 12V, 10A ,120W solar panels connected in series-parallel connection.
A set of two solar panels connected in series
Series Voltage:
V1 + V2 ….. + Vn
12V + 12V = 24V. … (Voltage is additive in series connection)
Series Current:
I1 = I2 ….. = In
10A = 10A = 10Ah … (Current is same in series connection).
Now, we have two sets of series connected solar panels. If we connect these two set in parallel:
Parallel Voltage:
V1 = V2 ….. = Vn
24V = 24V = 24V … (Voltage is same in parallel connection
Parallel Current:
I1 + I2 ….. + In
10A + 10A = 20A … (Current is additive in parallel connection).
Finally, we get 24V, 20A from four PV panels each of 12V and 10A i.e. we doubled both the voltage and current capacity of solar panels e.g. voltage from 12V to 24V and amperage from 10Ah to 200Ah by connecting PV panels in series-parallel configuration.
Related Posts:
- How to Design and Install a Solar PV System? With Solved Example
- A Complete Note on Solar Panel Installation with Calculation & Examples
Wiring Photovoltaic Panels in Series-Parallel Connection
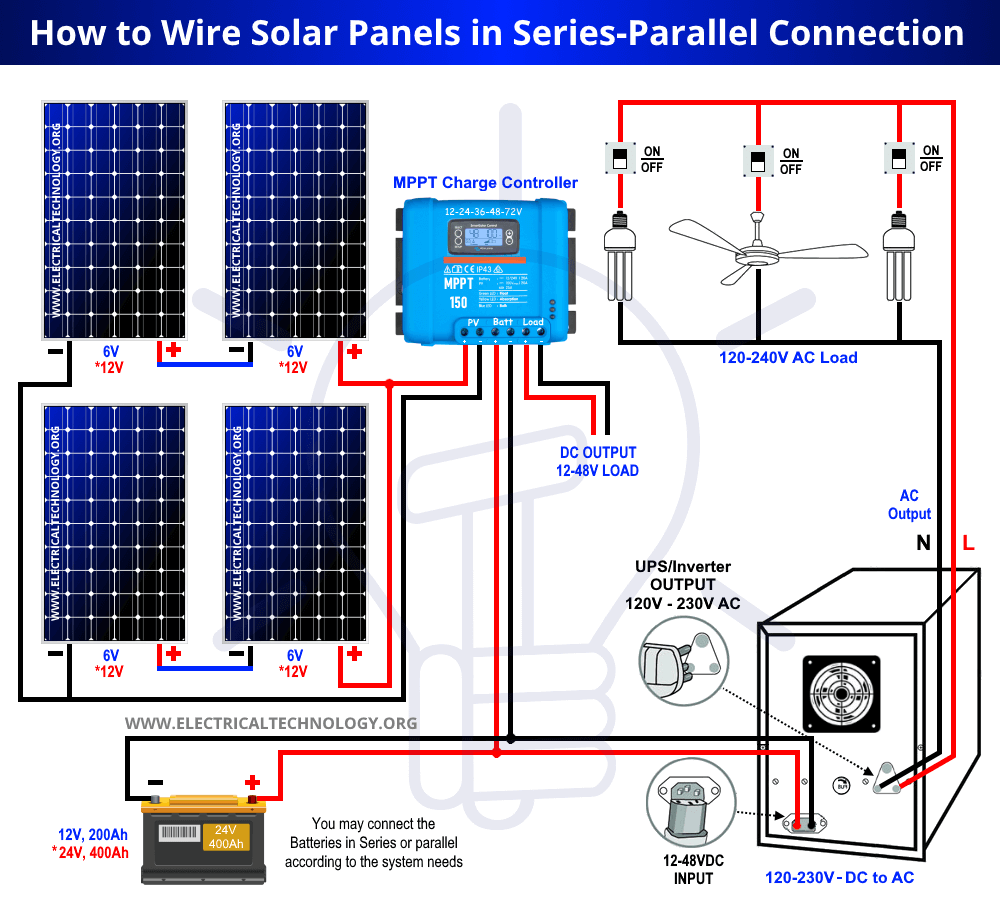
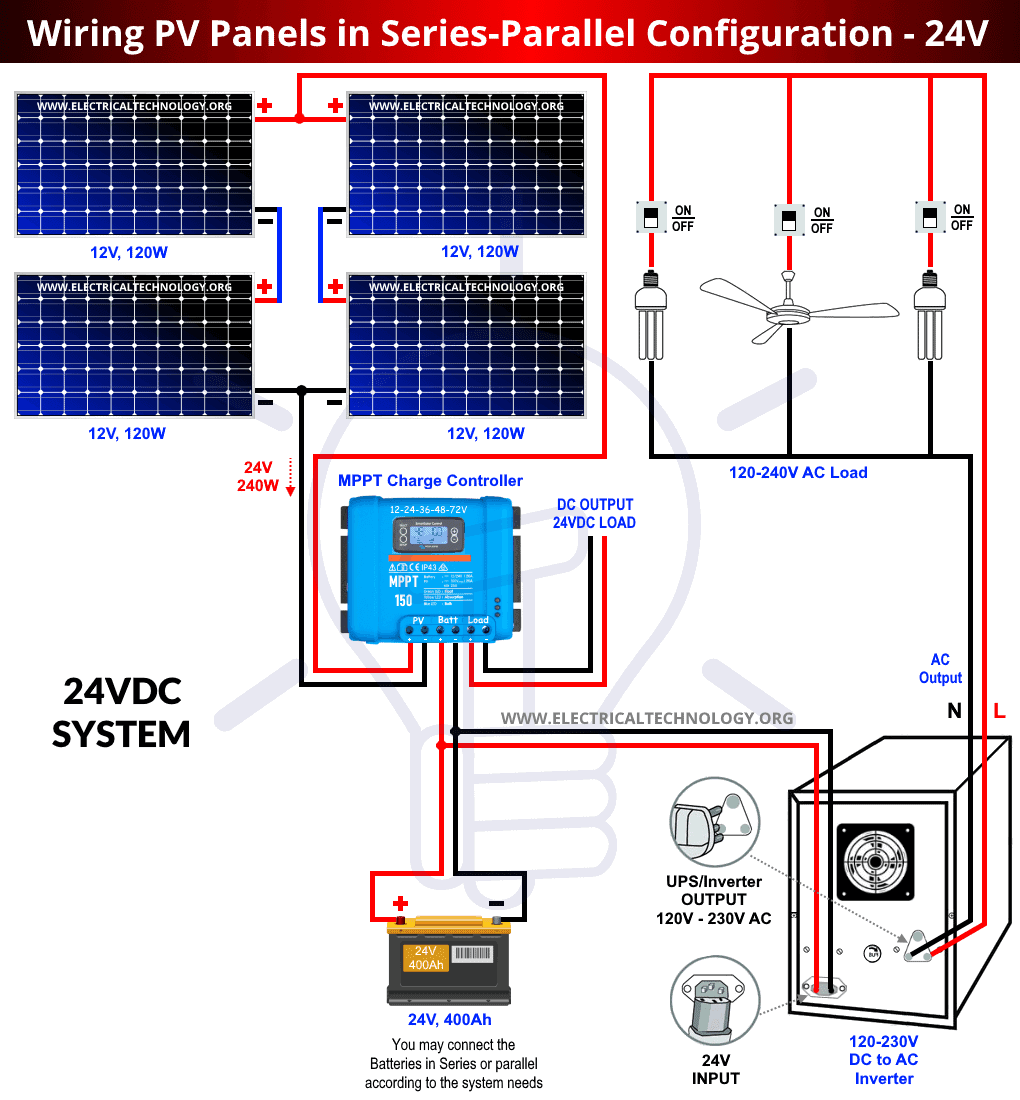
To do this wiring, make two sets (pairs) of PV panels and connect them in series. This way, you will have two pairs of solar panels connected in series. Now, connect the two sets of series connected solar panels in parallel as shown in the following fig. Now, you are having four 12V, 10A solar panels connected in series-parallel configuration.
As a next step, you can connect these solar panels to a charge controller. A basic DC load (12 or 24V) can be directly powered up by connecting it to the charge controller.
The AC load can be powered up in two ways. Firstly, it can be directly powered up by solar power during the normal sunshine (day). Secondly, the AC load (120V/230V AC) can be powered up by the stored power in the batteries using an inverter during shading (or night). Keep in mind that the number of solar panels and batteries depends on the load requirements where solar panels keep charging the batteries as well as power up the AC load.
The following solar panel and battery wiring diagram shows how to wire a four 12V Solar Panels in series-parallel connection to a 24V, 400Ah battery with an automatic inverter system. Note that the number of solar panels and batteries depends on the system’s design and load requirements i.e. multiple batteries and solar panels can be connected in series, parallel or series parallel connection to increase the Ah rating and storage capacity. (we have discussed them in previous post).
This wiring is fully automatic due to auto UPS wiring i.e. no need to install an auto or manual changeover / ATS switch to change between the solar power or battery storage power to the load points.
Related Posts:
- How to Wire Solar Panel to 120-230V AC Load and Inverter?
- How to Wire Solar Panel to 12V DC Load and Battery?
Good to know:
- Current is additive while voltage is the same in parallel connection.
- Current is the same while voltage is additive in series connection.
- Only the same rated solar panel can be connected in series, parallel or series parallel connection.
- A 12V solar panel can only be connected in (series, parallel or series-parallel) with another 12V solar panel.
- A 12V solar panel should not be connected (in series, parallel or series parallel) to a 6V or 24V solar panel.
Related Solar Panel Wiring & Installation Diagrams:
- How to Wire Solar Panel & Batteries in Series for 24V System?
- How to Wire Solar Panel & Batteries in Parallel for 12V System?
- How to Wire Solar Panels & Batteries in Series-Parallel Connection?
- How to Wire Solar Panels in Series & Batteries in Parallel? 12/24/48V System
- How to Wire Solar Panels in Parallel & Batteries in Series? 24V System
- Basic Components Needed for Solar Panel System Installation
- How Much Watts Solar Panel You Need for Home Appliances?
- Which Type of Solar Panel is Best: P Type or N Type, and Why?
- How to Calculate the Right Size of Solar Charge Controller?
- How to Calculate the Number of Panels for a Load without Battery Backup?
- How Many Panels, Batteries, Charge Controller and Inverter Do I Need?
- How to Design a Solar Photovoltaic Powered DC Water Pump?


There is an error in the diagram, “Wiring PV Panels in Series-Parallel Configuration – 24V”. It shows the flow from the panels to the controller as “24V, 240W” but it should be “24V, 480W”. The Watt is a unit of power; it doesn’t matter if wattages are combined in series or parallel, they are added in both cases.
If the panels were labeled as “12V, 10A” (120W), the two-panel series strings would be “24V, 10A” (240W); combining those two strings in parallel would result in “24V, 20A” (480W) going to the charge controller.
Labeling the diagram as Volts and Amps would reinforce the lessons about series and parallel combinations taught in the body of the article.
Thank you for pointing that out. We have made the necessary corrections in accordance with the article and provided examples.