
Measurement of AC and DC Voltage with a Multimeter – (DMM + Analog)
Voltage measurement is one of the simplest and easiest tasks to perform with a DMM (digital multimeter) or an analog multimeter. It is carried out to troubleshoot, repair or analyze a circuit and is one of the most fundamental yet essential tasks in electrical maintenance. In this step-by-step tutorial, we will show you how to measure voltage using digital and analog multimeters.

Multimeter
A multimeter (also know as AVO meter (Amp-Volt-Ohm Meter) is a device that is used for the measurement of different electrical quantities such as voltage, current, resistance, capacitance, transistors, diodes and temperature, etc. They can be used to check for continuity in wires, fuses, circuit breakers, resistors and other damaged components.
In this multimeter tutorial, we will measure the AC and DC Voltage using DMM and analog multimeter with step by step guide.
What is Voltage?
The difference of electrical potential between two points is known as voltage or potential difference. It is measured in volts. Voltage can be either alternating AC or direct DC. The AC voltage swaps polarity continuously, therefore; it does not have specific polarity. While the DC voltage remains constant having fixed polarity.
As the voltage is the potential difference between two points, measuring the voltage does not require you to open the circuit. You only need easily accessible two points of the circuit.
Related Posts:
- How to Measure Current using Digital and Analog Multimeter?
- How to Check a Capacitor with Digital (Multimeter) and Analog (AVO Meter)
Measuring AC Voltage using Digital Multimeter:

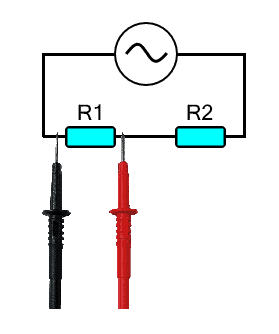
- To measure the voltage, the Multimeter must be connected in parallel to the voltage source, load, or any circuit.
- First, make sure the circuit that is to be analyzed is easily accessible for placing the probes.
- Turn the meter ON by switching the ON/OFF button. Some turn ON by using the dial.
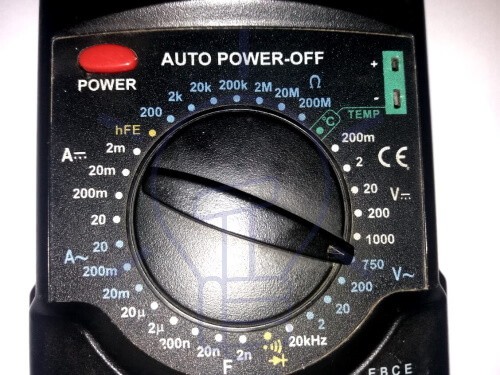
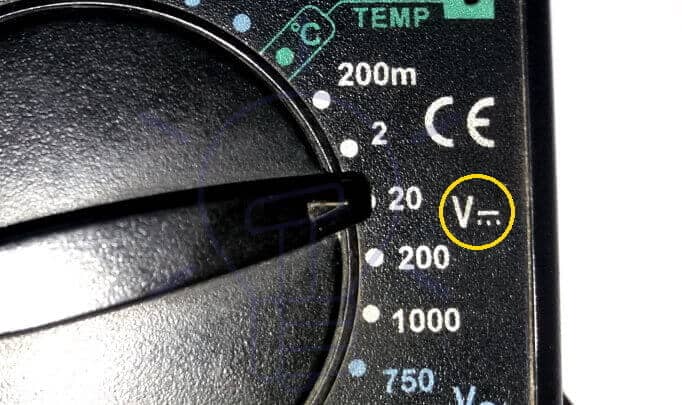
- Turn the dial to ṽ (V with a wavy symbol on top of it). it refers to AC voltage.

- If there is the availability of range selection (some meters have auto range mode for selecting range based on the reading), set the range to the largest expected value.

- If the voltage is unknown, set the dial to the highest voltage range.
- Insert the black probe into the COM (common) socket. It is easy to identify in every meter.
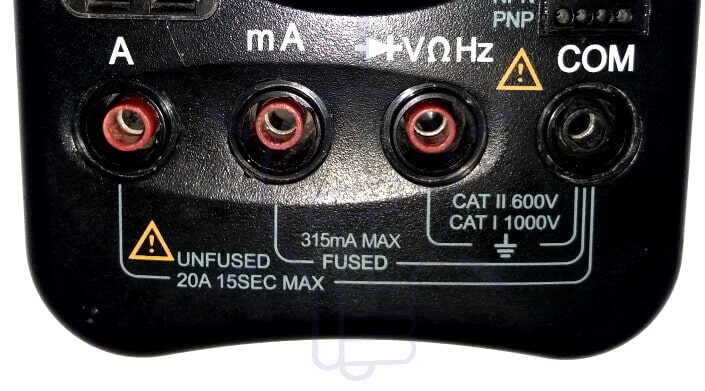
- The red probe must be inserted into its correct socket. Some meters have a dedicated socket for voltage while some have a combined socket for V-Amp-Ω. Insert the red probe into the socket having V on it.

- Place the black lead first on the lowest voltage point such as the ground.
- Place the red lead on the higher voltage point.
- Note the reading in the multimeter.
- If the range is set to the highest voltage range, reduce it step by step to achieve maximum resolutions and get an accurate reading.
- Once the measurement is complete, remove the red probe first and then the black probe from the test points.
- Remove both probes from Multimeter and turn off the meter.
Note: Do not touch the tips of the lead even if one of them is connected. Do not allow the tips of the lead to connect with one another. Be very careful when working on the AC voltage of the mains as it can shock or electrocute a person if necessary precautions are not taken.
- Related Post: How to Test a Diode using Digital and Analog Multimeter
Measuring AC Voltage using Analog Multimeter:
- Switch ON the multimeter
- Turn the dial to AC voltage.

- Using the selector knob on the dial, select the most suitable voltage range. It must not be less than the voltage being measured otherwise overloading may damage the meter.

- If the voltage is unknown, set the knob at the maximum voltage range available.
- Insert the black probe into the COM socket.
- Insert the red probe into the VΩ Or any socket that has a V symbol on it.

- There are some analog multimeters that have different sockets for high and low voltages. Make sure to use the correct socket.
- Place the black lead first on the low voltage point.
- Next place the red lead on the high voltage point.
- Or just simply connect both leads across the component if unsure of the voltage level.
- Ensure the deflection is maximum by decreasing the voltage range using the knob. It increases the accuracy of the reading.
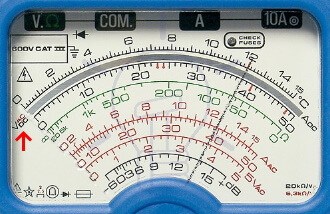
- Note the reading on the scale. The reading must be done by viewing the meter at a right angle to avoid parallax error.
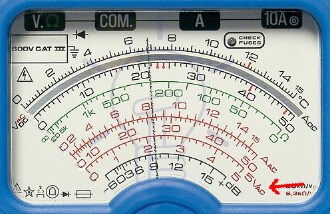
- Based on the selected range (500), this readings shows 220 v. because 500 is the full scale deflection (FSD).
- When finished measuring, remove the red probe first and then the black probe.
- Turn off the meter and set the range at maximum to prevent any damage in case of quick reuse.
Note: AC voltage has no polarity. Therefore, it does not matter if you switch the probes. The needle will always show the same degrees of deflection.
- Related Post: How to Check a Transistor by Multimeter (DMM+AVO)
Measuring DC Voltage using Digital Multimeter:
- Ensure the circuit is easily accessible.

- Turn the meter ON by pushing the ON/OFF button or by turning the knob on the dial from the off position.
- Turn the dial to DC voltage (V with straight light with 3 dots on top of it).
- If there is the availability of range selection (some meters have auto range mode for selecting range based on the reading), set the range to the largest expected value. For example, set the range to 20 for testing a 12 v circuit.

- If the voltage is unknown, set the dial to the highest voltage range.
- Insert the back probe into the COM (common) socket.
- The red probe must be inserted into its correct socket. Some meters have a dedicated socket for voltage while some have a combined socket for V-Amp-Ω. Insert the red probe into the socket having V on it.
- Place the black lead first on the lower or negative voltage point.
- Place the red lead on the higher voltage point.
- Note the reading in the multimeter.

- If the range is set to the highest voltage range, reduce it step by step to achieve maximum resolution and get an accurate reading.
- Once the measurement is complete, remove the red probe first and then the black probe from the test points.
- Remove both probes from Multimeter and turn off the meter.
Note: It is safe to work and touch a DC circuit at low voltage. However, it is best not to touch the tip of the leads during reading as it may inflict errors in the measurement. Do not touch the tips of the leads together.
- Related Post: How to Perform the Continuity Test with Multimeter?
Measuring DC Voltage using Analog Multimeter:
- Turn the meter ON.
- Rotate the knob to DC voltage “VDC” or (V with a straight line having 3 dots with it).

- Set the range greater than the expected value of the testing voltage.

- If the voltage is unknown, set the range to the maximum available limit.
- Insert the black probe in the COM socket
- Insert the red probe in the VΩ socket preferably having VDC written on it.
- Place the black probe on a negative or lower voltage point.
- Place the red probe on a positive or higher voltage point.
- Reduce the voltage range to achieve maximum deflection to increase accuracy.
- Note the reading from the VDC scale (do not confuse it with VAC scale).
- When done, remove both probes red first and black second.
- Turn off the meter. Also, set the range to max to avoid damage during quick reuse.
Note: Mind the polarity while using an analog multimeter to measure DC voltage. It will not show any deflection when connected with opposite polarity. It may in some case cause damage to the meter.
- Related Post: How to Test a Relay? Checking SSR and Coil Relays
Overload Condition
Overload condition occurs when you have selected a voltage range lower than the voltage to be measured. The meter cannot measure the voltage as it exceeds its measurement range. Overload conditions are not harmful or damaging for the multimeter.
Using Digital Multimeter (DMM)
In overload condition, the DMM will show digit “1” or “OL” or “out of range” on the screen. To remove the overload condition, Increase the range using the selector knob step by step until you get your expected reading.
Using Analog Multimeter
In an overload condition, the analog multimeter will show Full Scale Deflection “FSD” of the needle. It must be avoided to avoid any possible damage. Avoid using low voltage ranges for unknown voltage measurement using analog meters.
- Related Post: How to test a battery with Test meter?
Swapping Terminals
Alternating or AC Voltage Measurement: While measuring AC voltage, swapping the test probes or the test leads with one another will not affect the reading. It is because the AC does not have polarity.
Direct or DC Voltage Measurement: While DC voltage measurement, swapping the test probes with one another will show a negative sign with the voltage readings. The negative sign implies the negative polarity of the voltage.
Test Probe Selection
Test probes are available in two designs; the pointed needle tip probes and the alligator probes. The lead tip probes are the standard probes that need to be held in place during measurement. The alligator probes have a spring-loaded clip that is clipped to the circuit and does not require you to hold them with your hands.
Related Post: How to Test and Fix the Printed Circuit Board (PCB) Defects?
Damaged Probes
Probes having exposed or broken wires are hazardous for mains voltage measurement. It can also add error in reading.
Avoid Probes from Placing in Amp Socket
One of the rookie mistakes is that we do not remove the probes when we are done with the meter. We usually let the probes in their respective socket which is bad practice. If the red probe is in the amp socket (used prior for measuring current) and we connect the meter in parallel to the circuit (for measuring voltage), the huge current flowing due to the small resistance of the Ammeter will burn the meter.
Related Multimeter Tutorials:
- How to Test Electrical and Electronics Components and Devices with Multimeter
- Basic Electrical and Electronics Engineering Tools
- How to Find The Suitable Size of Cable and Wire for Electrical Wiring Installation?
- How to Find the Proper Size Outlets, Receptacle and Switch?
- How to Find the Right size of circuit breakers?
- How to Calculate the Value of Resistor for LED’s?
- How to Calculate the Battery Charging Time and Charging Current? Example
- How to Find the Proper size of Earth Conductor, Earth Lead and Earth Electrodes?
- How to Find The value of Burnt Resistor? (4 Methods)
-
 How to Size Feeder Conductors with Overcurrent Protection
-
 How to Size Service-Entrance Conductors and Feeder Cables?
-
 How to Size Equipment Grounding Conductor (EGC)?
-
 How to Size Grounding Electrode Conductor (GEC)?
-
 Grounding and Methods of Earthing in PV Solar System
-
 Difference Between GND, 0VDC, Common and Virtual Ground